
Supplies:
- Bezel cup pendant
- Magazine or paper
- Mod Podge (I prefer the Gloss-Lustre finish)
- 2 Small paint brushes
- Resin
- Mixing cup
- Scissors
- Necklace chain
- Pens
Optional Supplies:
- Washi Tape
- Rubber gloves
- Respirator mask
- Parchment Paper
Instructions:
In this tutorial, I will explain how to create an image three different ways, but you aren't limited to these three ways. You can combine them, use photographs, or experiment with your own images. (Tip: I have found that images printed from ink jet printers will tend to smear. I recommend using images printed from laser printers. If you do not have a laser printer, you can get prints from Office Max/Depot, Kinkos, Staples, etc for relatively inexpensive.)
Using a Mazagine:
1. Flip through a magazine until you find a pattern or image that you like.
2. Trace the bezel cup on the magazine page. (Tip: I found that using a Sakrua Microperm or Micron pen works well as it does not smudge if you move the bezel cup by accident.) Don't worry if the lines are not perfect, you will be cutting them off so they won't show.


3. Cut out the image. The clipping will be slightly bigger than what you need; slowly trim off the edges until you get it to fit in the bezel cup. This make take a few tries. (Tip: If you are going to make lots of images for your particular sized bezel cup, I recommend make a template out of card stock, so you can trace the template rather than the bezel cup. It is a little more accurate.

4. Once you have your magazine piece cut out, you can draw on it and decorate it with pens. To add bright colors, I like using Sakura Gellyroll Moonlight pens. In this example I used: They blend well and "paint" on. Make sure to let them dry so they don't smudge (it only takes about 30 seconds to dry). You can also use Microperm or Pen-touch pens to decorate your image. The Pen-touch pens require a little more drying time.
5. Once your image is finished, skip below to the finishing instructions.


I used the Sakura Gelly Roll® pens in colors: Moonlight Fluorescent Yellow, Moonlight Fluorescent Pink, and Moonlight Purple on this example.
Using Paper:
I have found that thicker shiny paper works well with resin. Matte paper can sometimes fall apart with the process.
1. Trace the bezel cup on the paper. (Don't worry if the lines are not perfect. You will be cutting them off so they won't show.
2. Cut it out. The paper will be slightly bigger than what you need; slowly trim off the edges until you get it to fit in the bezel cup. This may take a few tries.
3. Decorate it! I have tested out a lot of pens with resin and I really like the Sakura Gelly Rolls® for bright colors, the Microperm® for black lines, and the Pentouch® for golds, silvers, and coppers. (You can always experiment with other pens too. My test is if it smears easily or smears after putting a little Mod Podge on top of the dried ink, then it probably won't work well with resin.)
4. Once your image is finished, skip below to the finishing instructions.

I layered Pentouch® and Gelly Roll® pens, then added black lines over the color ink with a Microperm® pen. This picture shows the image before adding the black lines.
Using Washi Tape:
1. Follow steps 1 and 2 under Using Paper, then decorate with washi tape. (Tip: Apply the washi tape to the paper and then cut off the edges of the tape.)
2. Once your image is finished, following the finishing instructions.


Finishing Instructions:
1. Using Mod Podge and one of your small paint brushes, coat the inside of the bezel cup. Make sure to get all the edges and corners. You only need a thin layer.

2. While the Mod Podge is still wet, stick your image in the bezel cup and push down. Hold for a few seconds. You can use the end of your paint brush to gently push down the edges and corners. Some Mod Podge will spill out to the front of your image - this is okay! The Mod Podge dries clear.

Make sure to press down the corners and edges. You can use the end of your paint brush.

The Mod Podge will spill out around your image - this is okay - it dries clear.
3. Once dry, add a coat of Mod Podge to the top of your image. Let dry and then repeat. (Tip: I like to coat 2-3 times with Mod Podge to ensure the image is "sealed." If it isn't sealed, resin can leak under the image and cause splotchy discoloration. This will happened to you at some point - it's okay, it adds character.)

Coat the top of your image with Mod Podge.

This is what the pendants look like when the Mod Podge is wet.

This is what the pendants look like after the Mod Podge is dry.
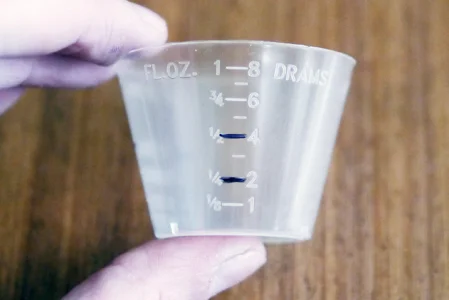
4. After the top layers are dry, then you are ready for resin! Using a mixing cup, mark off how much resin you need. Resin comes in two parts: Part A (Resin) and Part B (Hardener). You have to mix equal parts. (Tip: If you don't mix equal parts your resin can cure sticky.)
- The minimum amount of resin you should pour is 1/2 tablespoon. Mark your mixing cup with a permanent marker (Sakura Mircroperm® works great!) at the 1/2 tablespoon mark and the 1/4 tablespoon mark.
- Optional Step: put on rubber gloves and respirator mask.
5. In a well ventilated space, pour Part A (Resin) in the cup to the 1/4 tablespoon mark. Then pour Part B (Hardener) in the cup to the 1/2 tablespoon mark. Using the second small paint brush, mix the resin and hardener. Be sure to get along the edges and bottom to ensure it is all mixed together. (Tip: Mixing for about 1-2 minutes works well. You shouldn't see any separation or ghosting of the materials. Pro Tip: Mix slowly. Mixing will cause bubbles; the more bubbles you have in the mixing cup, the more will be in your bezel cup.)
6. Using the brush, gently and carefully drop/paint the resin into the bezel cup, going along the edge first then filling the middle. Fill the bezel cup to the lip. Be careful not to overfill! Overfilling will cause your pendant to stick to the surface it is on if it dries. (Tip: I have found that using parchment paper helps prevent the resin from sticking to the surface that you are pouring resin on, but the resin will still stick to the back of our pendant. You can try to carefully pick up your pendant and wipe off the back with a paper towel, but it will probably have some resin still on the back. Sometimes you can pop off the excess resin once it is dry - depending on the pendant material and how bad the spill over was.)
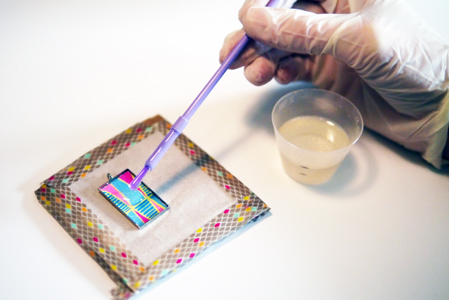
"Paint" in the resin. Be careful not to over fill the bezel cup. For this tutorial I put parchment paper on a piece of cardboard, to create a backer for the pendant so I could pour the resin on a flat surface. I taped the parchment paper down with washi tape. This is helpful if the eye of the pendant is large than the cup. You can push the eye into the cardboard so the pendant lays flat.
7. Once the resin is poured, check for bubbles. Small bubbles will typically rise to the surface, but large ones need to be popped. You can use the end of your paint brush, a sewing pin, or even a paper clip.
- For tiny bubbles, you can try using a heat gun to help raise them to the surface. On the lowest setting hold the heat gun about 6-12 inches above the pendant. (Tip: Don't move the heat gun fast across the pendant because it can cause the resin to blow over the lip. Pro Tip: Keep your heat gun clean because it can blow tiny fuzz bits into the drying resin which are really hard to get out.) The heat gun also helps start to set/harden the resin.
- If you don't have a heat gun you can also breathe on it, similar to when you breathe on a window to fog it up to write on (open mouthed and a ha-ha breath). You don't want to really be hovering over your piece breathing in a lot o the resin fumes, so when I do this I try to do it quickly to get most of the bubbles out. The rest of the bubbles usually work themselves up to the surface.

8. Let dry for 24 hours. (Tip: I cover mine with a plastic bin so dust doesn't fall into the resin while it's drying.)
9. Once it's dry, string on a necklace chain and enjoy!

Resources for materials:
- Sakura Pens: Gelly Roll®, Micoperm®, Pentouch® and many other cool pens.
- Rings and Things: Sells bezel cup pendants, cuff links, belt buckles, earrings, necklace chain, and mixing cups.
- Ice Resin: There are lots of different types of resins you can experiment with, but I prefer Ice Resin. Ice Resin also has tutorials, videos, and example projects on their site.
Disclosure: Sakura America gave me pens to experiment with for this resin tutorial. Thank you Sakura!